Showing posts with label jackets. Show all posts

Saturday, May 7, 2011

You are amazing: Thank You!

Some figurative, British grown sweet-peas just for you!

Thank you for all your thoughtful, encouraging and prompt responses.  I was explaining to my mom a while ago that the internet and blogging has allowed me to learn to sew.  Without contact and information from more experienced sewers out there, I would have given up in frustration a few years ago when I started.  Imagine trying to learn to sew in a world where your friends and neighbours don't sew, and all you have are the patterns to go by!

I would probably do a better job, if I set the jacket aside and had a little breather.  On the other hand, it will niggle me to have it around taking up mental space.  (It's just my personality.  Have you noticed how quickly and frequently I comment?  I am a completer finisher.  I hate loose ends.  I tend to be engaged.)

As for my jacket:

1. Trims:
I can't use the selvage to trim the jacket because I didn't keep it!  Rookie mistake.  I agree with the commenters who thought the jacket looked fine without any trim.  On the other hand, I plan to wear it with jeans and t-shirts, so I don't want it to look like the jacket from a traditional work suit that has been split from it's skirt.  Does adding the ribbon trim help avoid that?

2. Buttons:
The sleeves are vented, so I think I have to put some buttons on the vent to keep it from looking odd.
I love Nancy's snaps idea, what a great escape!  I just wonder about the buttons.  If I sew buttons on top of the snaps, the buttons will be on the wrong side of the jacket, when it is open.  I plan to wear the jacket open 90% of the time.  What's the proper convention for buttons on top of snaps?  Which side do you sew them on?  The left or the right?

3. RTW-sewalong
Steph asked if I was following Sherry's sew-along.  Yes!  Well, as best I could.  I obviously wasn't following it carefully, because I did not use stay tape.  I did use strips of interfacing around the armholes though, just not on the hems or the tops of the sleeve pieces.  I did follow her order of construction and did all of her suggested under-stitching.  Her method for attaching the collar was much better than what I had been doing.

OK, this is my last whine for help.  My next post regarding this jacket will be the finished article, whether it turned out or not!

Friday, May 6, 2011

Moving Right Along: Burda 3/2011-109

Burda 3/2011-109


I have to admit, I am getting a bit fed up with this one, and cannot seem to finish it off!  I am unable to make any machine button holes because the fabric is too thick to fit under my button hole attachment!  In order to finish this thing, I am going to have to do hand stitched button holes.  Not what I had in mind.


This jacket is supposed to be trimmed in petersham ribbon around the hem and lapel edge.  I no longer like the dull gold ribbon that I have.  I am wondering weather black or maybe cream would be better.  If you have any thoughts or preferences on this, I'd be really interested in what you have to say.  I am a little stuck here.


So far this project has it's good and bad points (like all projects).  


The good:

  • Beautiful fabric
  • A very good fit (It's a close fit and really sculpts the waist while still being comfortable.)
The bad:
  • The finish is pretty poor, I wasn't aiming all that high and seem to have barely mustered adequate rtw
  • The lining is pretty inelegant in places, though I doubt anyone but me will ever notice lousy hand-stitching at the sleeve hems
  • The fabric was easier to work with than I anticipated, but it did unravel horribly, I lost hem and sleeve allowances just by handling it.  It was also easy to stretch out of shape with too much handling.  Somethings that I didn't achieve to my satisfaction just had to be left alone so as not to make matters worse with stretching and unravelling
It's now far too hot to wear this, and I really want to move on to causal trousers and floaty tops but I need to trim it and add buttons.  I can't decide weather to persevere doggedly, or hang it in the back of my closet with the buttons in the pocket and get going on it next March.  What would you do?

Tuesday, May 3, 2011

Muslin, Burda 3/2011-109: RTW Sewalong

Sadly, I caught a tummy-bug from my eldest that's why I am practically wearing pajamas!
I am more than a little behind in the RTW sewalong, but hey-ho.  Here is my muslin.  I am lazy, so lazy I was tempted not to make a muslin.  I am glad I had all of your advice (and sometimes even nagging!) ringing in my ears.  The sleeve on the left (as you face the picture) is as per the pattern.  The sleeve on the right has an inch and eighth taken out of it.  What an improvement!  Making the sleeves slimmer opens up a gap between my arm and my body making my waist look slimmer, yay!  Also, I took the opportunity to practice my vented sleeve construction techniques, which was a big help.

Sherry's sew-along is a wealth of information.  That woman really does deserve a book deal!  In my case some of the advice is a case of "pearls before swine."  I just can't take it all in.  I am incorporating everything that I understand.  These are the changes that I have made to the pattern so far based on her advice:

  • Adding a little to the collar
  • Setting the under-collar on the bias
  • Adding a little to the lapel edges
  • Adding for the turn of the cloth
I understood all these changes, so I am fairly confident that I won't end up "up a tree I can't climb down!"

Tuesday, March 22, 2011

Another Hotpatterns' Rivieria Cardigan Jacket

Hotpattern Riviera Cardigan Jacket

This is the second time I've made this jacket.  I've made it both times out of double knit.  I did a better job this time with the collar and lapel, but I still had booboos along the way.   I got so confused, I attached the collar three times - there are only two ways to do it!  I actually unpicked the whole thing once, when I had done it correctly- argh!   I also struggled with the top stitching.  I had a stretch needle, a stretch setting on the machine, and a roller foot; and I still worked hard to get it to make any seam at all and not to end up with all the fabric in the needle plate.  Forget even and perfect seams!  And there was no way to get close to the edge.  By the end of the project, I loosened the tension which helped some.

I did not stabilise the shoulder seams.  I should have.  I've read a million times in the sewing blog world to stabilise the shoulder seams on knits.  I never do it.  I always wish I had.

Enough of the complaints; I actually really like this jacket.  It looks better on me than the mannequin.  It is comfy and sunny.  Perfect.

The rolled hem foot was brilliant, easy to use and a great edge.
I had a scrap of silk left over from my May ball dress last year.  I used my new rolled hem foot to make a little scarf which adds a nice splash of drama to the jacket.  I was about to cut the dress up to make a slinky top, but my husband dissuaded me.  He thought our daughters might want to see mommy's pretty dresses someday.  


Monday, March 21, 2011

Jacket Trims

Ribbon, Button and Lining
I was able to nip into town to buy the interfacing for my jacket.  While I was there, I  picked up this hot-pink lining at John Lewis.

I also went to VV Rouleaux for petersham ribbon.  Even with all the selection there, I didn't find anything I loved.   So, I went for this almost neutral ribbon.  It doesn't contrast much with the jacket, nor does it clash.  It will define the edge of the jacket without being graphic or making much of a statement.

My quest for buttons was fraught.  Buttons are getting harder and harder to find.  I tried the Button Queen, but there wasn't much there!  Surprising for a shop that only sells buttons.  Next, I tried John Lewis, but they didn't have enough of the buttons that I liked.  Finally I went down to Cloth House in SoHo.  Their shop at no.47 has a pretty good selection of buttons.  Again, there wasn't enough stock for my first choice buttons (or second, third, or fourth!)  At this point I was determined to come home with buttons, so I settled for these turquoise buttons.  Not at all what I had in mind, but still OK.

It will be a long time until the jacket is made and can be trimmed, so maybe I will find new options before then.  If not, I'll go with these.  I like the TV character, Emma Pilsbury, but I don't want to look like her!  I am happy for the jacket to be fun and Springy, but I don't want it to look cutesy wootsy!

Thursday, March 17, 2011

Tweed Chosen and Ordered!


I called up the folks at Linton Tweed and asked for some samples.  I asked for three samples and this is what they sent:


Being sent 15 swatches rather than three didn't make the choice easy!


And that is not all they sent!  Check out these wool crepes:


These are the height of luxury, thick and spongy.


I really think this is the best customer service I have had since I moved to the UK.  I didn't even have to pay postage costs for the samples!  At around £22/metre for the tweeds and £18/metre for the crepes, it's not cheap.   It is value for money though.  Buying fabric from Linton is probably the only thing I will ever have in common with Coco Chanel.  


At one point, I was pretty sure I was going to buy one of these tweeds:


All classically Spring, either light and bright or navy blue.


In the end, I just chose the one I fancied most and decided not to worry if it fit the season or not.


I am not sure if the black threads are very Spring-y, but I liked it.  And, I ordered it!


Based on the fabric I chose, I decided to play it straight and sew up the Burda Jacket (March 2011, style 109) as presented.  If it is a rip-roaring success, I'll have the confidence to try something edgier in the Fall.  Now, I just need to get my interfacing and notions in time for the sew-along.

Thursday, March 10, 2011

Tweed Jackets

I'd like to make myself a tweed jacket.  I am just so in love with Linton tweeds and besotted by the fact that they are still made here in England!  The trouble is, it's easy to end up looking like a lady of a certain age who lunches in a fancy tweed jacket.  How to do a modern jacket with beautiful, traditional tweed?  


The March Issue of Burdastyle has a tweed jacket with a sewing course (instructions.)  I've had good luck with these before, so I am considering it
Burdastyle 109, March 2011
I just wonder if it will end up looking a bit too fussy to wear with jeans.  So I've gone looking for modern, casual versions.  I'm not sure I've found the silver bullet yet though.  Here's a few:


Tweed Denim Blazer, McQ by Alexander McQueen
Tweed Denim Blazer, McQ
From the
Liberty department store website


Roberto Cavalli 
Roberto Cavalli Leather trimmed tweed and silk chiffon jacket, picture from Net-a-Porter.com


Isola Marras boucle tweed jacket
from
Flannels fashion


Zac Posen 
Zac Posen Ocelot tweed jacket from Net a Porter


Rebecca Taylor Seaside Jacket
Rebecca Taylor
from
zappos.

I'm still not sure, so if anyone has any inspiring ideas, please do feel free to comment!  All suggestions will be gratefully received.


I notice that the jackets I am attracted to are a little distressed, with unfinished edges and possibly zips, and untraditional trims such as leather or denim.  Also, all these jackets are in drab colours.  I'd prefer to make a bright springy coloured jacket.  I am sick of winter.  I wonder if this sort of thing would work with candy colours or if you just have to stick neutrals.  Thoughts?


The bright coloured tweeds tend to be on the retro-with-a-twist jackets.  I like them, they are definitely cute.  But I worry about looking like mutton dressed as lamb.  Sometimes the cuter the garment, the less cute I look myself in juxtaposition! 


I need to figure out what I am doing quickly because Sherry at pattern ~ scissors ~ cloth is doing a jacket sew along starting in April and I don't want to miss out!  If you've been following her sew her totally unnecessary cocktail dress, then you are probably keen to join too.  She has made a button, but I don't know how to link it to anything, so click here if you want to join her tailoring sew a long post.


This might be my last post for a few days.  I have two children's birthday parties to throw over the next ten days and I'd like to do a little sewing! :-)


Thursday, November 11, 2010

Shearling


Lambskin Jacket from Elegance, £999
I admit I am all over wanting a shearling aviator jacket.  Good thing I didn't have £2K burning a hole in my pocket last September! LOL.  However, I still want some sort of shearling layering piece.  So, I have been researching where to get shearling here in the UK, and learning a few things about shearling along the way.    I'll share what I've learnt with you and my preferred suppliers, just in case anyone else fancies shearling this winter. 

First, shearling is NOT cheap, even on an island overrun with sheep!  Shearling is still sold by the square foot.  Obviously, skins are oddly shaped and once you know how many square feet you need, you should buy some extra unless you are able to buy your skins in person with pattern pieces in hand to check against.

Now for suppliers, first I tried Alma Leather, but they really didn't seem interested in dealing with me.  I had to chase them hard and in the end the man I spoke with felt that his skins would be too thick for my machine anyway.  An excuse to get rid of me?  Maybe.


Shearling samples from Fenland Sheepskin , the plush side.
Then, I went to Fenland Sheepskin in Somerset.  Angela, who helped me over the phone was very kind and helpful and put some samples in the post to me straight away, at no charge.  The quality was good.  I am sure it would fit through my machine, and they charge £4/ft for it.  I also like the idea that it is made right here in Somerset and not shipped from far away.

Shearling samples from Fenland Sheepskin, the suede side.
However, I was disappointed that the non-fur side was suede.  I wanted a Napa finish.  Angela explained that the napa side is actually underneath the wool.  That to get a napa finish on shearling requires a resin treatment on the suede which comes off over time and with wear.  Good to know, but I still want the leathery napa finish.

So, on to my next contender, Walter Reginald.  The sales girl there popped some samples in the post straight away at no charge.  Now, this is more like it.  Lots of plush side choices, and all with a napa finish on the leather side.  Of course, getting exactly what you want costs more.  The first sample on the top of the page is £3/ft and all the rest are £5.25/ft.  Naturally, the one on top is the coarsest and least likely to go through my machine.  
Walter Reginald samples, plush side.

Walter Reginald samples, napa side.  This is not a great picture.  Suffice it to say that the leather side is soft and smooth, some are buttery soft.

 I figure that a simple gilet will need a minimum of 20ft, a jacket upwards of 30ft.  So, this is not a cheap and cheerful home project.  It would still be good value if you could pull it off though.  It would cost about a quarter to a tenth of what it would cost to go out and buy.  I am still keen, but I think I will have to wait until after Christmas to figure out whether I can afford to splash out on myself like this.

Thursday, September 16, 2010

I'm Jumping off this Train!

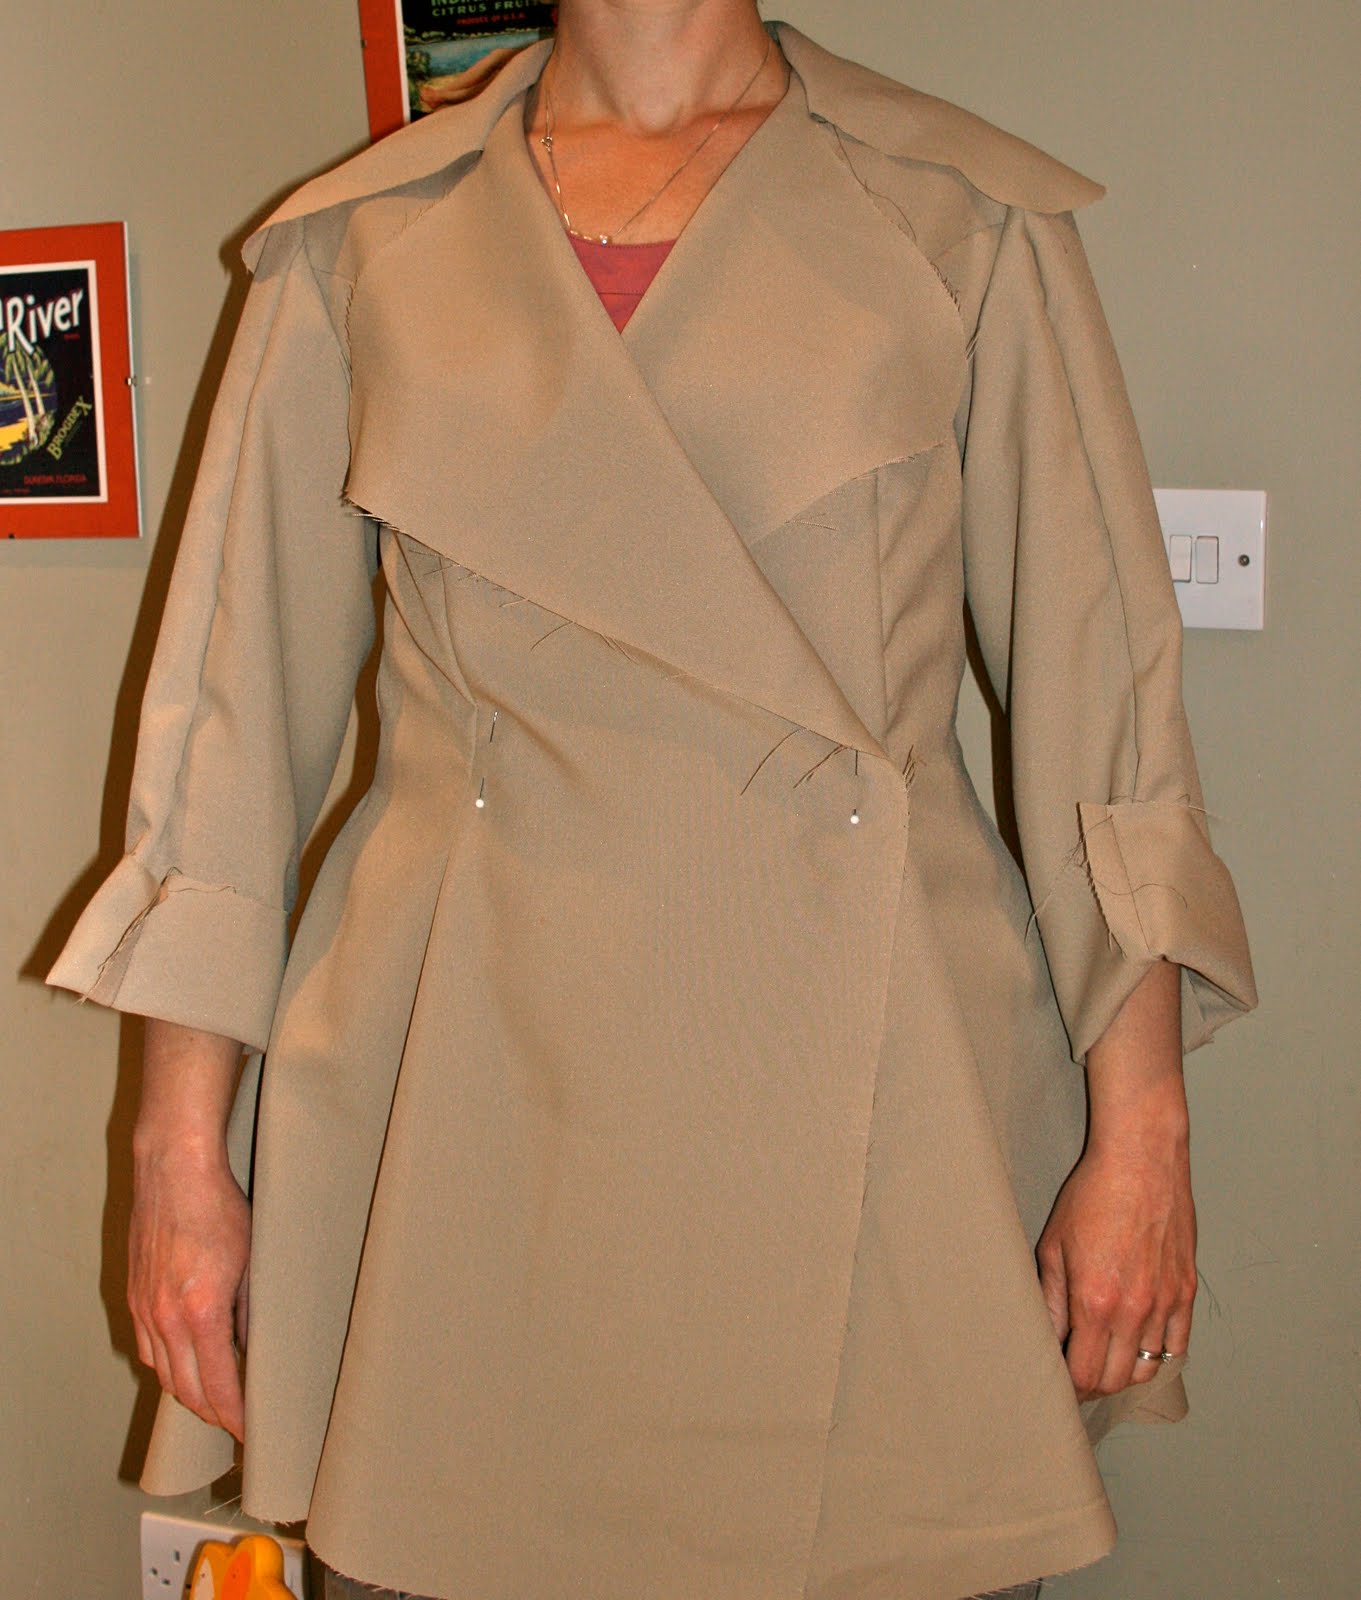
Lady Grey Coat, size 10
I made a quick and dirty muslin of the Lady Grey Coat in a size 10.  There were many fit issues that needed to be addressed, yet I couldn't work up any enthusiasm.  The style, though lovely in the abstract makes, me feel frumpy.  I am going to consider the effort I have made so far a sunk cost and move on.  I have always had wide hips.  Fifteen years ago, I would have felt that the peplum hid them. Now, I feel the peplum accentuates them. 

I should hasten to point out that the Colette Pattern was very good.  A true premium product with excellent instructions and attention to detail.  If there is ever a style that I think would suit me, I would not hesitate to buy it.  


Just to show that there are some women out there who look great in this coat, here are some stunning examples.  How cute does Tasia look in hers?  Heather looks smokin' hot in hers, too.  Seeing these two women's versions was part of what made me want to join the sew along and make this coat. 


Meanwhile, thank you, thank you, thank you everyone who urged me to appreciate Muslins last April.  Making this muslin saved me a lot of disappointment, and even helped me to use up some ugly fabric and last bits of thread on bobbins.


Finally, Pam at Off the Cuff is about to start a series of blogs about tailoring while she sews herself a McCalls jacket.  If you've found my obscure blog, you're almost sure to have already found Pam's, but I mention this just in case.  Pam really knows her stuff and her tutorials have been a big help to me as a beginner.  She has an August 30th post sharing a hassle free way to home shrink your wool as well.

Monday, September 13, 2010

OMG! She actually sewed something!

Burda, Jacket 120 from the April 2010 Magazine
After a summer of no sewing, just stash buying, blog reading, and day-dreaming, I have finally sewn something.  Hooray!

This jacket from Burda's April 2010 magazine was an odd choice for me.  It's not the sort of thing that I normally wear and there isn't much in my wardrobe that goes with it either.  But never mind, I am pretty chuffed with it.
Technical drawing
I decided to go for it for two reasons.  First, it was a pattern with a "sewing course," ie. there are diagrams along with the instructions, and I wanted more practice with jackets.  Second, I bumped across denim with a vinyl print on it for sale on Goldhawk Road at a cheap price.  This was exciting because Burda had actually made this pattern up with just such a fabric.  While reading the magazine I had snorted about the fabric, thinking no one would ever be able to find the stuff and therefore recreate the jacket.  But lo, there it was!  So I decided to give it a go.
Burda's version
I think my jacket looks very much like Burda's, though I am not much like the model, sigh.

The pattern was actually surprisingly easy to sew up.  Everything is well drafted and matches up easily.  The written instructions are still inscrutable, but the diagrams make all the difference.  My only difficulties came from the fabric itself which is very stiff.  So setting the sleeves was a pain, but doable.  Also, the vinyl print made it difficult to press. Even with a rag between the fabric and the iron the vinyl tended to melt.  At a low enough heat to protect the fabric, creases couldn't be made, so it was a tricky.  I wouldn't sew with this sort of fabric again.  It's definitely a novelty, and perhaps even cheesy.  So for me this was a one off.  But a fun one that got a big thumbs up from my 6 year old.

Wednesday, July 28, 2010

Up in the Air Junior Birdman!

Burberry Prorsum Fall 2010 Ready-to-Wear
Burberry ProrsumAviator Jacket from style.com


Burberry Prorsum Cropped shearling aviator jacket
Burberry Prorsum Aviator Jacket from Net a Porter

These Burberry "bomber jackets" look pretty good.  I suspect I am not the only one who thinks so.  At about £2K a pop, I also suspect I am not the only one who will have to give them a miss!  


Sandra Betzina has made a new pattern for Vogue that is a bomber jacket made out of shearling or faux shearling.  The made up jacket photo looks awful.  It looks like black faux shearling.  Not in the slightest way lust worthy.  However, the line drawing isn't so bad maybe.  

Line Art
Vogue 1198
It's no where near as impressive as the Burberry versions, but perhaps in a brown shearling with antique brass zips and an enlarged funnel neck it would begin to hit the spot.  Although, I suppose, all the finishing details that really make the Burberry jacket would be difficult to imitate.  FabricMart sells shearling skins from Uruguay.  But I didn't see any matching sheep skins.  So you wouldn't be able match plain leather and shearling on a single jacket.  And, I think, it might be the plain leather that you need to finish off edges and bits and pieces to get things looking polished.


I also have no idea whether a home sewing machine can handle shearling.  I know that some shearlings are softer and more supple than others.  The best are supposed to come from Spain and Argentina.  Uruguay is just next door to Argentina, so FabricMart may have some decent stuff.  Even if you get the proper-good-stuff, will it feed through a home sewing machine?  I kind of suspect not.


For me, this project is a non-starter, much as I wish I could.  Is there anyone else out there drawn to this who thinks they can pull it off?

Wednesday, October 21, 2009

It's Already too Cold!


I finally got around to making Hotpatterns, Riveria Boulevard Cardigan-Jacket (HP 1031).  I ran into a few problems, but I love the material so much, and the cut is so good, that I would really like to wear it anyway.  Unfortunately, this was the perfect jacket for late Summer, not proper Autumn.  It's just too cold and wet now.  I'll have to wait until Spring.  It would look nice with a lemon yellow t-shirt, I think.


Before sewing this pattern, I looked around to see what other people had already done with it, and how it worked out for them.  Not many people have sewn this pattern it seems, so I'll go into some detail, just in case there is anyone looking for a thorough review.


I live in ratty old fleeces, and embarrass my daughter, when I pick her up at school.  I thought this would have a soft, unstructured feeling while still looking a little more pulled together.  It does!  It is very comfortable and flattering.  While the finished product looks boxy, the pattern itself is loaded with gentle curves that cleverly sculpt it to the human form.  The different decorative seams help divide your body up, making you look a little less bulky.  I have a small bust, and I thought the front details suited me.


As for the sewing.  It wasn't difficult so much as tedious.  I don't have a serger and the pattern has 3/8" seams.  That meant I had to sew each seam three times!  Once to get the 3/8" seam.  Once to finish the edge with over-locking (my machine gives me a 1/8" seam allowance when I over-lock).  And once to cover-stitch.  I was sewing on stretch stitch settings and ended up going through more than 200 meters of thread!  I had to finish the final cover-stitching in a slightly different thread colour because I couldn't find any more of my original thread which I had bought 50 miles away. Aargh!  


The instructions do include some basic diagrams.  They don't go into a lot of detail, though.  A more detailed picture of how to attach the yoke to the body would have been a big help for a novice like me.


My hints and tips would be: 1) Do the topstitching.  It makes all the difference to final appearance of the jacket.  2) When choosing fabric, choose something of which your machine can handle a four-fold thickness.  3) Don't bother with interfacing unless you choose the lightest jersey.  This is a soft, slouchy sort of piece and increasing the thickness will make attaching the yoke that much harder.  4) Choose a solid fabric.  There is plenty of interest in the pattern itself, and you won't have the headache of getting the pattern matched at all these different seams.


Now that I have made it once, I am tempted to make it again in French terry for the Summer.   I have already done the hard part of figuring out the instructions, and now I know to buy three spools of thread!  Plus, I now have the cut-out, traced-out pattern on hand.  Then again, my machine is pretty basic, and I had real trouble sewing the collar, yoke and body together.  I had four layers of fabric (I did not use any interfacing) and my machine barely made it.  The roller foot I had was not much help, even with the top stitching.