I'll just make this a photo essay, because a picture really is worth a thousand words! And, my apologies, to all of you for whom this is "old hat." I just wanted to share this with anyone else on a budget who might be inspired, and not have already bumped across it before. Like most other things in life, I learned this from my *Mother*.
 |
| This chair is one of a Harlequin set (meaning they look the same more or less, but are not all exactly alike.) We bought these antique chairs 8 years ago. I was attracted to them because they were relatively inexpensive, and I knew they could be easily recovered at home. Out of interest, these chairs are in a Georgian style, but actually very early Victorian. They were cheap because they aren't the best quality or condition, and there is not much market in Britain for old "brown" furniture. Never mind, I like it. |
 |
This is the beauty of it. The bottom just lifts out! I didn't even have to unscrew anything like I would have to do on a newer US chair.
|
 |
| So this is what came out. The old man we bought them from had picked a pretty bland fabric, but he was very proud to have stuffed them properly with horse-hair. Oh boy, I am not going to mess with that! |
 |
| Here is the fabric we chose. It is from Harlequin. I can get two chairs covered in each width, so after measuring, it will only take 2 yards to cover all 6 chairs- woo-hoo! |
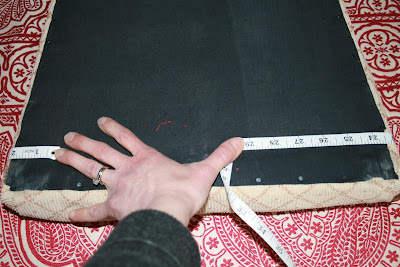 |
| Here is the proof that I really did measure rather than just eye-balling it. |
 |
| Terrible shadow, sorry guys! Because I chose to leave the existing upholstery in place, I added a layer of cheap, coarse, polyester wadding when I recovered the chairs. I got this off the bolt at my local quilting shop and just stapled it down with the new fabric. This way, any texture from the original upholstery will not press through. |
 |
The tool: a heavy duty staple gun. I wondered if it would get through the hard wood. It was fine. I used 8mm staples.
|
 |
| No sewing here! You just staple it on. I started with one staple on each side in the middle. Pull as tight as you can. |
 |
| Then I worked the corners by folding and stapling. Again, as smooth and tight as you can. |
 |
| Voila! But it looks a bit messy underneath. It won't show, but still... |
 |
| I'll just cover it with some muslin from IKEA. Just measure out. |
 |
Then press the edges over.
|
 |
| Then staple down. Tidy enough now for something no one will ever see anyway. |
 |
| The big reveal! Not bad for DIY! Looking at it, I think I'd better get the furniture polish out :) |


